一、常用代码收集:
0.wordpress常用标签
二、实现自定义logo功能
在function.php添加以下代码:
function followandrew_theme_support(){
	add_theme_support('custom_logo');

}
在后台就可以点击主题的cutom,然后可以上传logo。
在需要显示logo的地方加入以下代码:
<?php
if(function_exists('the_custom_logo')){
	$custom_logo_id = get_theme_mod('custom_logo');
	$logo = wp_get_attachment_image_src($custom_logo_id);
}

?>
<img class = "xxx" src = "<?php echo $logo ?>" alt="logo">
参考:https://www.youtube.com/watch?v=-h7gOJbIpmo
二、使用标签作为keywords
代码:
<?php if (is_single()) {

foreach((get_the_tags()) as $tag) {

$keywords[] = strtolower($tag->name);

}

foreach((get_the_category()) as $category) {

$keywords[] = strtolower($category->cat_name);

}

?>

<meta name=”keywords” content=”<?php echo implode(“, “, array_unique($keywords)); ?>” />

<?php } ?>
1.自定义字段
最开始我用的是自定义字段插件来实现的,后来发现自己用代码实现也非常简单。方法如下:
(1)在文章页面添加自定义字段(注意添加的时候一定要填值,开始我没填值,要么点了没反应,要么没添加成功)
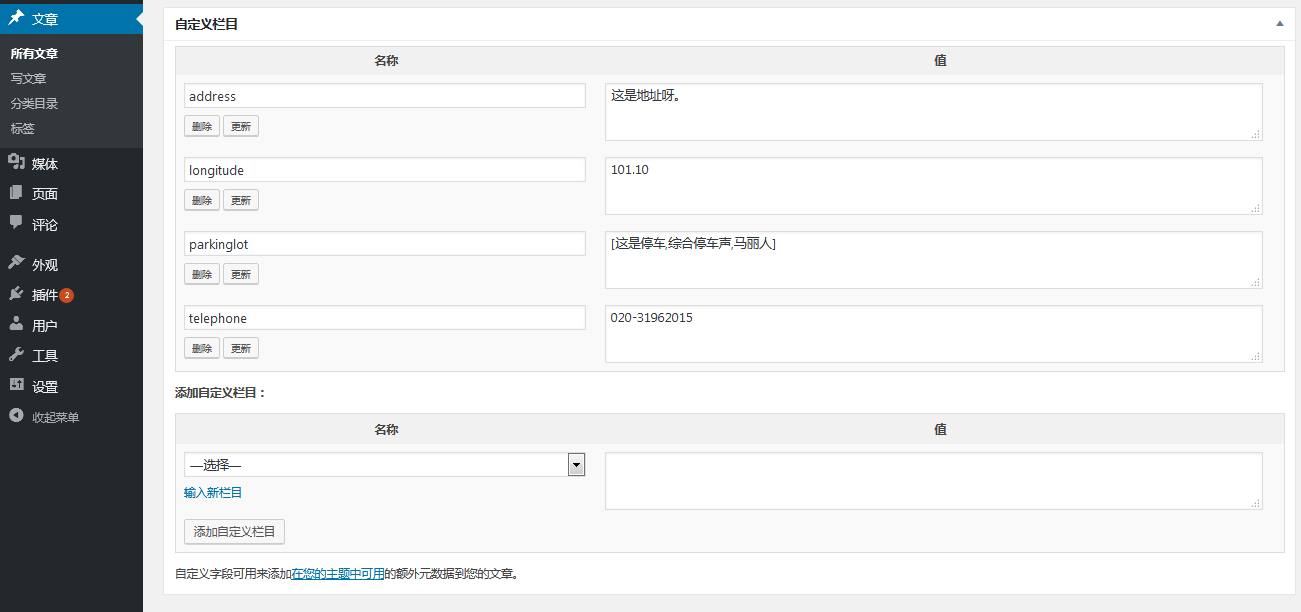
(2)然后在需要显示的地方使用以下代码调用:
<?php
	$product_name_def='尚未添加数据';
	$address= get_post_meta($post->ID,'address',true);
	// 检查这个字段是否有值
	if(empty($address)){
		//如果值为空,输出默认值
		$address=$product_name_def;}
	echo $address
?>
这里加了一个判断,是为了显示默认值。
最简单粗爆的方法可以直接使用下面的代码:
<?php
	$address= get_post_meta($post->ID,'address',true);
	echo $address
?>
这里又有一个坑,由于标点符号的问题,开始在JS里面的时候,老是不显示。
2.添加热门文章小工具:
首先我们建立一个hot.php,里面存放热门文章的代码及样式,这里的样式自己根据自己博客的样式更改呦。我根据自己的博客添加的样式代码如下:
<?php $popular = new WP_Query('orderby=comment_count&posts_per_page=10'); ?>
<div class="title-rec-tag"><span>热门文章</span></div>
<ul>
<?php while ($popular->have_posts()) : $popular->the_post(); ?>
<li><a href="<?php the_permalink(); ?>"><?php the_title(); ?></a></li>
<?php endwhile; ?>
</ul>
</div>
functions.php,添加如下代码
function mb_hot() { include(TEMPLATEPATH . '/hot.php'); }
if( function_exists( 'register_sidebar_widget' ) ) {
    register_sidebar_widget('热门文章','mb_hot');
}
然后在后台小工具那里,就可以找到“热门文章”的选项,然后就可以直接拖到Sidebar里面显示了。
3.相关推荐的代码:
直接在模板中写入以下代码即可:
<ul id="cat_related">
<?php
$cats = wp_get_post_categories($post->ID);
if ($cats) {
$cat = get_category( $cats[0] );
$first_cat = $cat->cat_ID;
$args = array(
        ‘category__in’ => array($first_cat),
        ‘post__not_in’ => array($post->ID),
        ‘showposts’ => 6,
        ‘caller_get_posts’ => 1);
query_posts($args);
if (have_posts()) :
while (have_posts()) : the_post(); update_post_caches($posts); ?>
<li>* <a href="<?php the_permalink(); ?>" rel="bookmark" title="<?php the_title_attribute();
 ?>"><?php the_title(); ?></a></li>
<?php endwhile; else : ?>
<li>* 暂无相关文章</li>
<?php endif; wp_reset_query(); } ?>
</ul>
4、显示二级目录
想实现一个如下的效果:
1.现在function.php里面添加下面的代码
function get_category_root_id($cat)
{
$this_category = get_category($cat); // 取得当前分类
while($this_category->category_parent) // 若当前分类有上级分类时,循环
{
$this_category = get_category($this_category->category_parent); // 将当前分类设为上级分类(往上爬)
}
return $this_category->term_id; // 返回根分类的id号
}
2.然后在页面要显示二级分类的地方粘贴下面这段代码即可
<?php
wp_list_categories("child_of=".get_category_root_id(the_category_ID(false)). "&depth=0&hide_empty=0&title_li=");
?>
结果:

6.新建目录

代码:
import xlrd
from wordpress_xmlrpc import Client, WordPressPost
from wordpress_xmlrpc import WordPressTerm
from wordpress_xmlrpc.methods.posts import GetPosts,NewPost
from wordpress_xmlrpc.methods import taxonomies
wp = Client('http://127.0.0.1/18wp/xmlrpc.php', 'admin', '1234')

catogory_num = []
categoryname = ['健身','电影院','旅行社']
category_english_name = ['jianshen','dianyingyuan','luxingshe']

def creat_catogory(cityname,categoryname,categoryslug):
	for i in range(0,len(categoryname)):
		if len(catogory_num) == 0:
			#新建母分类
			cat = WordPressTerm()
			cat.taxonomy = 'category'
			cat.name = cityname#分类名称
			cat.slug = categoryslug#分类别名,可以忽略
			cat.id = wp.call(taxonomies.NewTerm(cat))#新建分类返回的id
			print("发布成功!新建设的母分类ID为{},名称为{}".format(cat.id,cat.name))
			catogory_num.append(cat.id)
			child_cat = WordPressTerm()
			child_cat.taxonomy = 'category'
			child_cat.parent = catogory_num[0]
			child_cat.name = cityname + categoryname[i] #分类名称
			child_cat.slug = category_english_name[i]
			child_cat.id = wp.call(taxonomies.NewTerm(child_cat))#新建分类返回的id
			print("发布成功!新建设的子分类ID为{},名称为{}".format(child_cat.id,child_cat.name))
		else:
			child_cat = WordPressTerm()
			child_cat.taxonomy = 'category'
			child_cat.parent = catogory_num[0]
			child_cat.name = cityname + categoryname[i]#分类名称
			#子分录的slug会是母目录名+category_english_name
			child_cat.slug = category_english_name[i]
			child_cat.id = wp.call(taxonomies.NewTerm(child_cat))#新建分类返回的id
			print("发布成功!新建设的子分类ID为{},名称为{}".format(child_cat.id,child_cat.name))
			if i == (len(categoryname)-1):
				catogory_num.pop()


#读取文件
workbook = xlrd.open_workbook(r'chongqing.xlsx')
sheet2 = workbook.sheet_by_index(0) # sheet索引从0开始

#由于有表头,从1开始,结束数值和excel表格中的相同
for i in range(1,sheet2.nrows):
    rows = sheet2.row_values(i)
    # print(rows[0],rows[1],rows[2],rows[3])
    creat_catogory(rows[0],categoryname,rows[3])
    print("OK"*50)
5.新建子目录
上面的代码有一个不足之处,就是需要一次完成,在后续需要添加子目录的时候就无法使用了,所以又需要一个直接添加子目录的方法:
import MySQLdb

# 连接数据库
db = MySQLdb.connect("localhost", "root", "", "wp18", charset='utf8' )


cursor = db.cursor()
cityname = "湖州市"
# SQL
sql = "SELECT * FROM wp_terms WHERE name ='{}'".format(cityname)
try:
    # Execute the SQL command
    cursor.execute(sql)
    # Commit your changes in the     database
    db.commit()
except:
    db.rollback()

row = cursor.fetchone()
print("查询到的母分类ID是:{}".format(row[0]))
db.close()
上面的代码本地连接xampp的mysql没问题,但是连接服务器的mysql无法连接,改用pymysql还是一样。
后来将脚本上传到服务器,host直接写localhost,用pymysql终于操作成功了。
(本文内容根据网络资料整理和来自用户投稿,出于传递更多信息之目的,不代表本站其观点和立场。也不对其真实性、可靠性承担任何法律责任,特此声明!)


发表评论 取消回复